11 min to read
Graphics Pipeline Overview
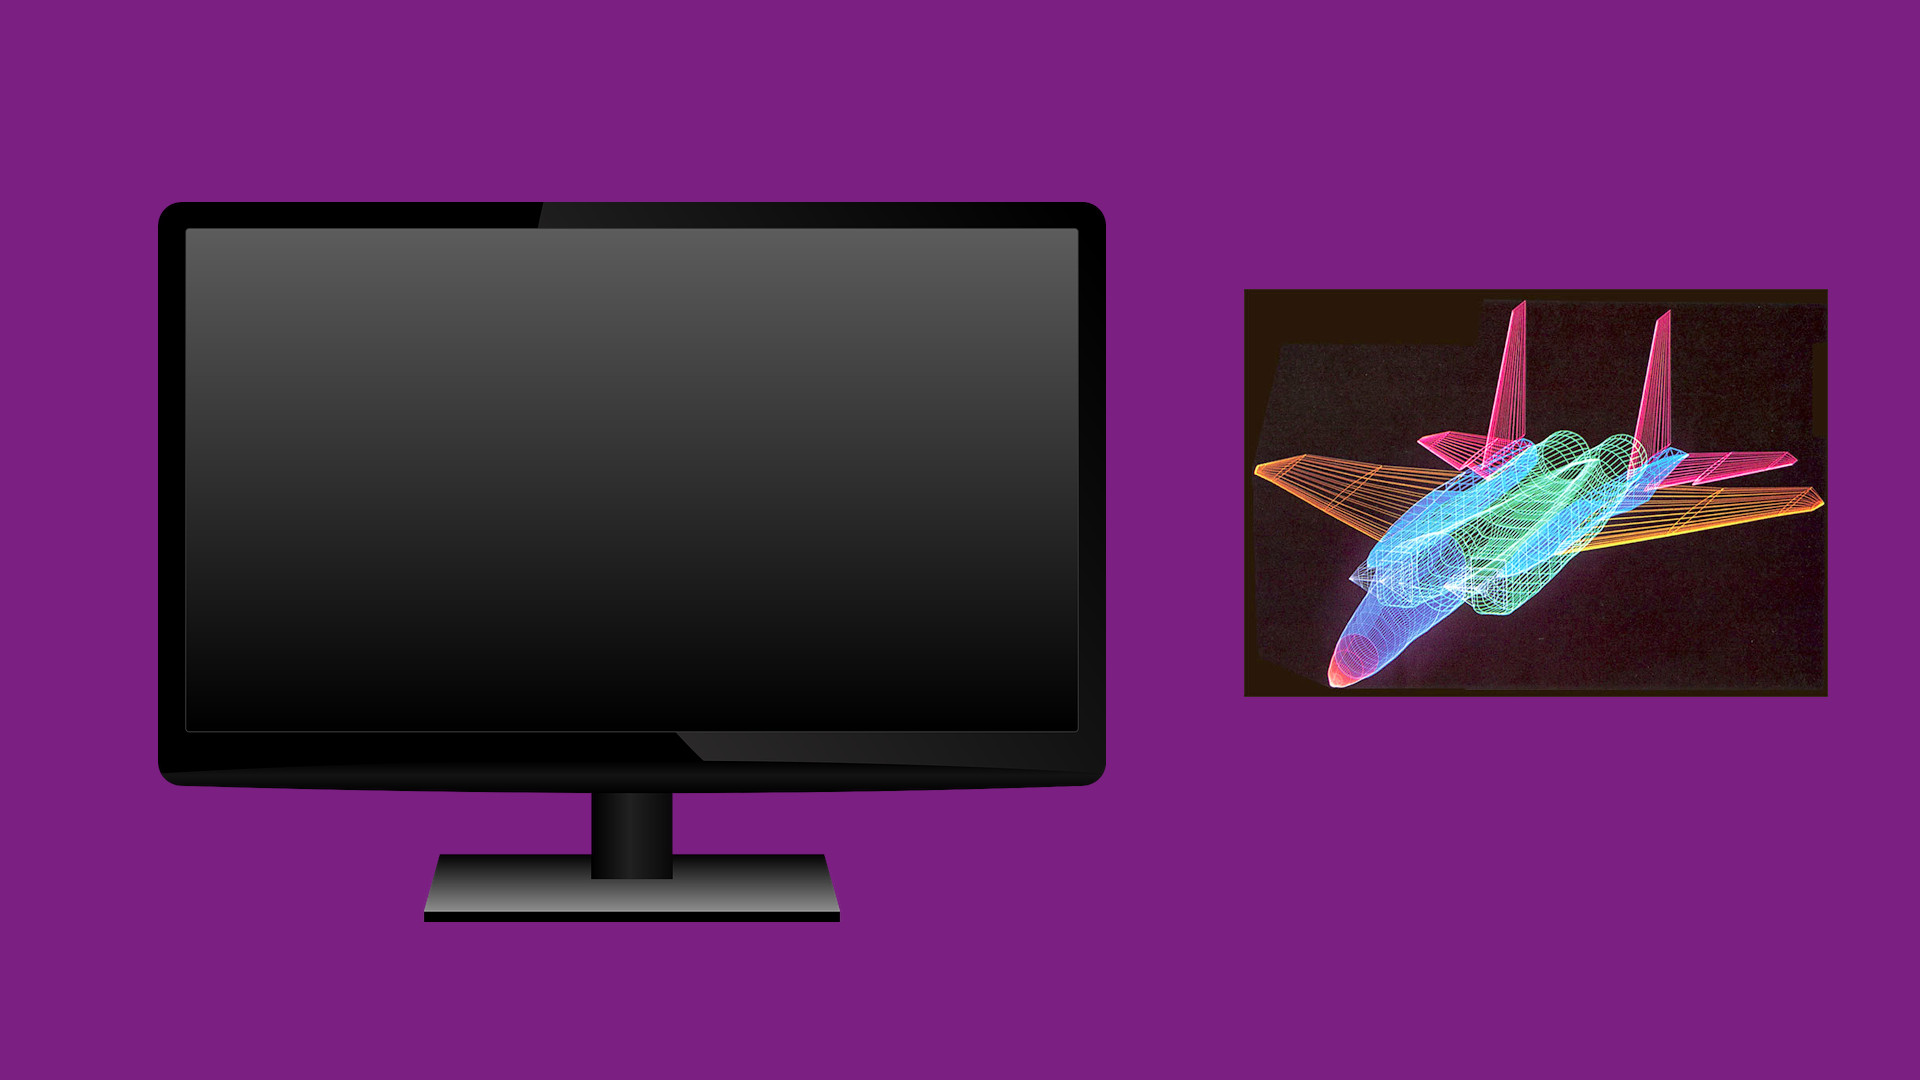
We are almost constantly manipulating the pixels on our screens. Be it watching movies, playing video games, or simply reading texts, pixels are continuously switching between millions of states (colours) every second as we use our computers.
But how does a computer find out the state of all the pixels for generating an image ? How does it know that one configuration results in the Eiffel Tower while another results in the Pyramid of Giza ?
In this post, we are going to understand how our GPUs convert 3D images/ scenes into 2D images on the screen. We are going to follow the journey of a 3D scene through various stages of processing, and conclude with its resulting 2D representation on screen.
Geometry Primer
Vertices are essential for creating any drawing in 2D/3D. In mathematics, vertices form the basis for geometry, with everything from 2D lines to complex 3D structures being composed of millions of vertices. Each vertex is associated with a position. This is (x, y) in case of 2D and (x, y, z) in case of 3D. These values are defined with respect to a fixed origin assumed to be at (0, 0) in 2D and (0, 0, 0) in 3D.
For simplicity, when talking about geometrical structures, we only think in terms of endpoints - for example, a line segment has 2 endpoints, a triangle has 3 endpoints, and so on. In common lingo, the term “vertex” refers to a geometrical endpoint.
When dealing with 3D scenes in context of computers, we mainly deal with triangles as the building blocks for all 3D scenes. This is because triangles have several useful properties, such as planarity, simplicity, and so on.
Talking to the GPU Hardware
Analogous to the main memory (RAM), the GPU has its own dedicated memory, called the vRAM (video - RAM). All data to be processed by the GPU must be present in this memory.
When running a 3D application, the CPU first brings the 3D scene data into the RAM. It then allocates vRAM to the application (called frame buffer). To fill the frame buffer, the data needs to be brought in from the RAM. To this end, the CPU provides the GPU with information on where the data is stored in RAM. The GPU then starts loading the data using DMA (Direct Memory Access).
Once the frame buffer is filled, the GPU runs the graphics pipeline, generating a 2D scene which is directly sent to the display adapter (consequently to the display) without CPU intervention. The most popular display adapters are
Talking to the GPU via Software - Graphics APIs
Due to the sheer complexity of most modern 3D applications (read AAA games), the use of APIs (Application Programming Interfaces) has become ubiquitous for all kinds of graphics programming. The primary benefits of the APIs is that they abstract away a significant amount of detail from the hardware, while still affording programmers control over the graphics operations. Some of the most well known APIs are OpenGL, Vulkan, DirectX 11 (DX 11), DirectX 12 (DX 12) , and Metal.
All APIs have specialized functions to query and manipulate the state of the GPU. While each API may have differing implementations, and some like Vulkan and DX12 are very low level, they all provide a way of querying the essential information including:
- Is the GPU active ?
- PCI port number
- Memory available
- Any exceptions encountered, along with a typical “GPU stack” trace
This is crucial for setup, debugging, and diagnostic operations while writing graphics applications. With a fair idea of how to communicate to the GPU, let us now turn our attention to the graphics pipeline.
Graphics Pipeline
Before going any further - an important assumption made is that we’re dealing with 3D scenes that have not been already rendered. The term rendered is loosely used to describe any information which is already in form of pixels (such as a picture file on your computer which does not need to be converted from vertices to pixels).
The functionality of the GPU can be equated to a camera that is capturing the external world onto a 2D screen. The object of interest (whose photo is being taken) needs to be determined, the positon of the camera should be fixed, and the camera should then be oriented to get the desired view of the object, and finally, the photo can be taken.
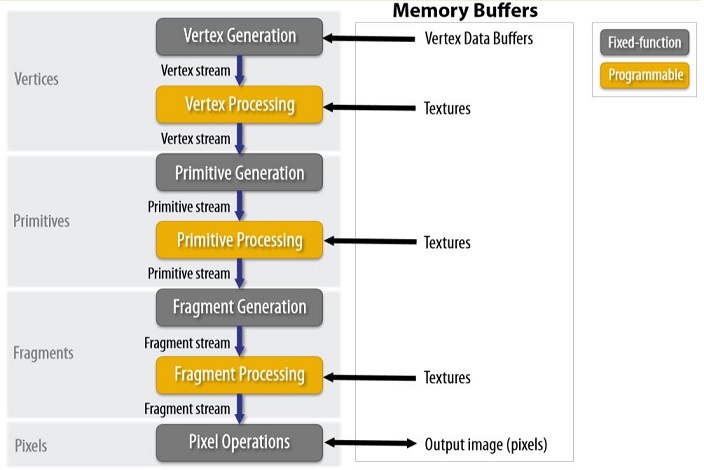
The graphics pipeline is analogous to this, with some additional constraints and freedom that the virtual world brings. A typical representation of the graphics pipeline is given below.
As seen in the figure, the main steps in the graphics pipeline are -
- Vertex Generation
- Vertex Processing
- Primitive Generation
- Primitive Processing
- Fragment Generation / Rasterization
- Fragment Processing
- Pixel Operations
I. Vertex Generation
Scenery is abound on the Earth (and outside the Earth), just waiting to be captured by a camera. Unfortunately for the GPU, the virtual world does not have a planet teaming with billions of lifeforms and diverse geographies to capture. Quite depressingly, it has nothing; think pre-Big Bang nothing. No light, no universe, no existence, and mosty importantly, nothing to photograph and post online !!
Consequently, the divine power of creating the world rests with the holy graphics programmer.
Moving on from the philosophy of quantum mechanics, the task of the programmer is to define exactly what is going to be displayed. And this involves visualizing the scene, defining the origin of the scene, and finally specifying all the vertices needed to draw the scene. For the sake of simplicity, let’s consider a scene with only a cuboid (which needs 8 vertices). The first task is to determine the parameters of the cuboid, viz., the length, the breadth, and the height. Then, one of the vertices is fixed as the origin and the position of the other vertices is defined such that they form the required cuboid.
Creation of this arbitrary cuboid can be seen below.
The stream of vertices is now passed to the GPU strictly in order (more on this in primitive generation).
II. Vertex Processing
Now that the object has been created, the next step is to place it in the “world” and in front of the “camera” to get the desired view. This includes performing various transformations such as translation, rotation and scaling (seen in the preceding animation).
III. Primitive Generation
With all the vertices now placed in front of the GPU “camera”, the next step is to assemble them together into the required geometric shape. Recall that the vertices were passed to the GPU in order. Based on this order, the vertices are grouped into polygons called primitives. As discussed earlier, the triangle is the primitive of choice in graphics due to the various desirable properties.
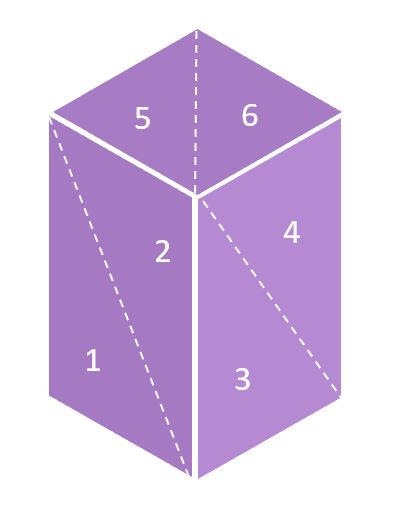
All geometrical shapes are thus represented using triangles. In our case, the cuboid has 6 faces each of which are represented by 2 triangles (as shown in the figure). We hence get a total of 12 triangle primitives that are generated to represent the cuboid.
IV. Primitive Processing
Each primitive can be rendered by the GPU. But should the GPU render each and every primitive ? Look back to the cuboid creation sequence. Are all faces of the cuboid visible at any time ? No ! So why should the precious GPU resources be wasted in rendering primitives that are not going to be visible ?
While it doesn’t seem to matter much here, the average number of objects in most graphics applications is in the thousands, and if all the primitives are rendered, we are looking at a primitive count in the neighbourhood of a million!
The solution is culling the primitives which are not visible, i.e. discarding them to prevent further operations.
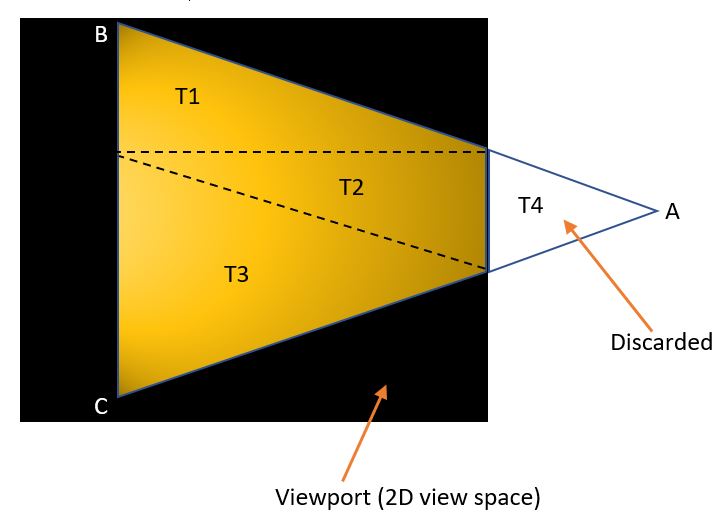
Another aspect to be considered is portion of the primitive which is being focused on by the “camera”. As shown in the figure below, the triangle is completely visible but a part is being hidden by the viewport. Again, if we render the entire triangle, we’re wasting potentially useful GPU resources.
The solution is clipping the invisible parts of the primitive. In the figure above, triangle ABC is only partially in view. Hence, the triangle T4 is clipped, and the resulting set of vertices are grouped into new primitives T1, T2, and T3.
V. Fragment Generation / Rasterization
Rasterization is the processs of tranforming the primitives onto fragments which consist of pixels on the screen, as seen in the figure. This is the step where we move away from the 3D representation of vertices onto the 2D representation of the screen.
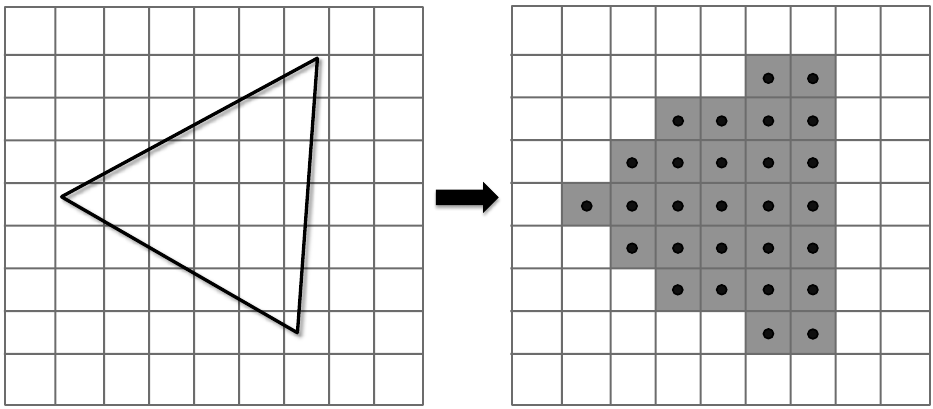 Looking at the camera analogy, rasterization is esssentially the step where the photo has been captured on the camera film.
Note that the ordering of the primitives doesn’t matter here, and each primitive can be rasterized in parallel.
VI. Fragment Processing
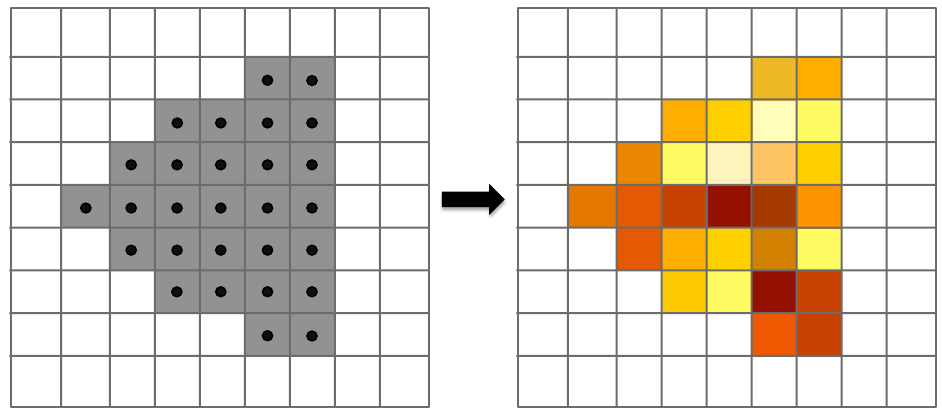
In this stage each fragment is shaded to give the desired colour. The shading can be controlled using programs called fragment shaders that are written by the programmer. A fragment shader takes a fragment as an input, and applies various colour interpolations to get the desired shading pattern. A simplistic example is shown in the figure below.
VII. Pixel Operations
Pixel operations are carried out by the GPU to determine the final state of a pixel. In case a pixel is covered only by a single fragment, the corresponding colour is applied to it.
As shown below, in case of fragments overlapping, the z-buffer is inspected to determine which fragment represents the object closest to the screen. Colour information from this fragment is selected and given to the pixel.
![]()
The resulting image is sent to the display over the display adapter.
Summary
The pipeline discussed here is commonly known as the raster pipeline and is the de-facto standard for designing GPU hardware and graphics APIs.
While the overall pipeline is followed in all the APIs, most of them have their own permutation and combination of functionalities. For example, certain APIs allow pixel culling to be done prior to fragment processing, saving performance.
The implementation details of each API are also widely different, with those like OpenGL and DX11 being relatively higher level and having lesser time to triangle (the amount of code needed to get a simple triangle on screen). On the other hand, APIs like Vulkan and DX12 have a huge learning curve due to the lower level hooks needed to be setup and a higher time to triangle. On the other hand, both Vulkan and DX12 have the potential for higher performance and control over the resource utilization, enabling tight optimization of resources.
In general the best API to get started with graphics is OpenGL. Vulkan is an API mainly targeted at experienced graphics devs who want to squeeze out that last bit of performance from their hardware.
Are you interested in getting into computer graphics and game development?
Here are some resources that I found extremely useful:
- Suraj Sharma’s OpenGL Series - basically guides you through setting up a 3D renderer.
- The Cherno’s OpenGL playlist - bares OpenGL in all gory detail
- The Cherno’s in-progress game engine series - that’s right. This is a game engine built from scratch by a former EA Frostbite developer.
Of course, if programming doesn’t interest you, there are a variety of game engines for you to try out:
- Unreal Engine 4 (Unreal 5 is inbound in a couple of months with the PS5 and Xbox Series X)
- Unity
- CryEngine
- Godot
Comments