13 min to read
RX 560X Overclocking Guide
Before We Begin
- Overclocking, undervolting, or tweaking any other GPU settings will
void the warranty .
Remember to disable Wattman and uninstall Afterburner before visiting the service centre ! - Avoid increasing the voltage and the power limit, even by small amounts.
Since laptops are optimized for power efficiency, chances are the motherboard won't be able to sustain the supply and may get damaged. - This guide minimizes the voltage and maximizes the clock speed.
Note that better results may be obtained simply by increasing the clock speed and the voltage, but the risks outweigh the benefits.
Prerequisites
- The latest Radeon Adrenalin Driver. Version >= 19.3.1.
- MSI Afterburner, for enabling Wattman and verifying the overclock.
-
3DMark benchmark suite,
for measuring the performance gain.
Download the basic edition and install the FireStrike benchmark. - Excel, notepad, or any other method to note down the results.
- Patience. In sufficiently high quantities :)
Step 1: Enable Wattman
Wattman is AMD's utility for tuning various parameteres of the GPU, including GPU clocks, GPU voltages, memory clocks, GPU fan-speeds, etc. It is available as part of the Adrenalin driver for desktop GPUs. However, it is disabled for mobile (laptop) GPUs by default due to the risk of damage to the laptop.
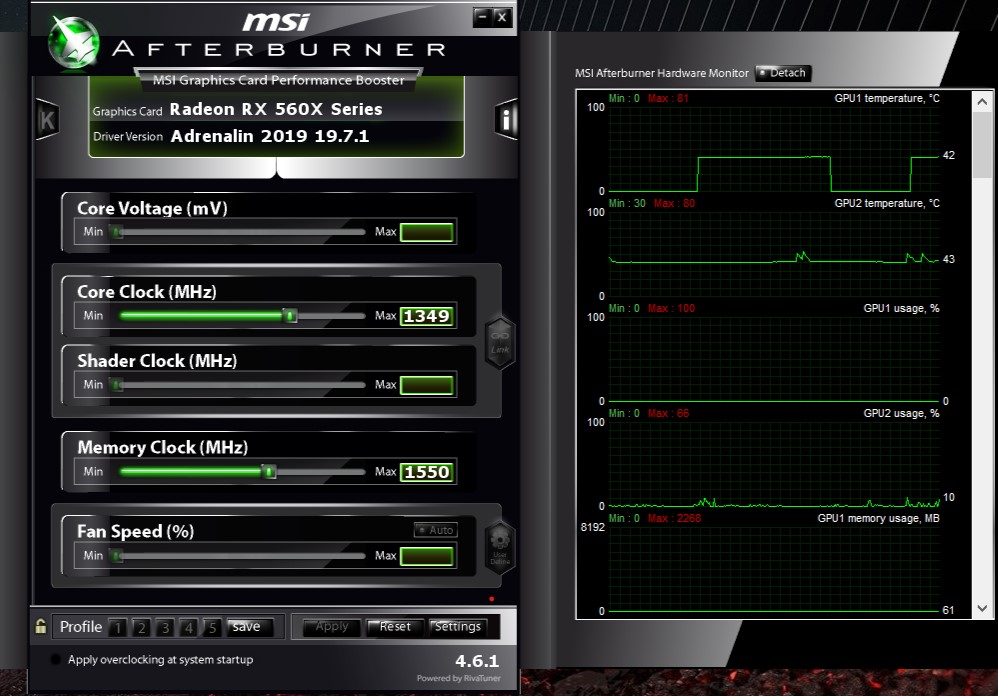
To enable Wattman, open up MSI Aferburner and ensure that the GPU listed is the RX 560X. The default clock speeds of the GPU and the vRAM should be visible.
Head into Settings. Again ensure that the GPU
selected is the RX560X
Under the General tab, enable the following options:
- Unlock Voltage Control
- Unlock Voltage Monitoring
- Extend official overclocking limits
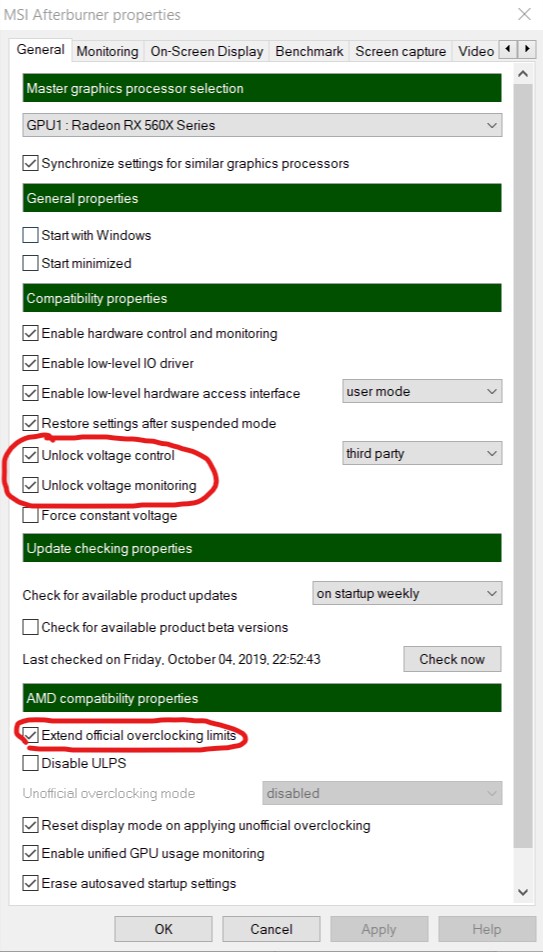
Click Apply to apply the changes.
When prompted to reboot, click Yes. You will
now be rebooted. Ensure that any important data on the system is saved before rebooting.
Step 2: Verify if Wattman is enabled
Open AMD Radeon Settings , and head into the Gaming tab.
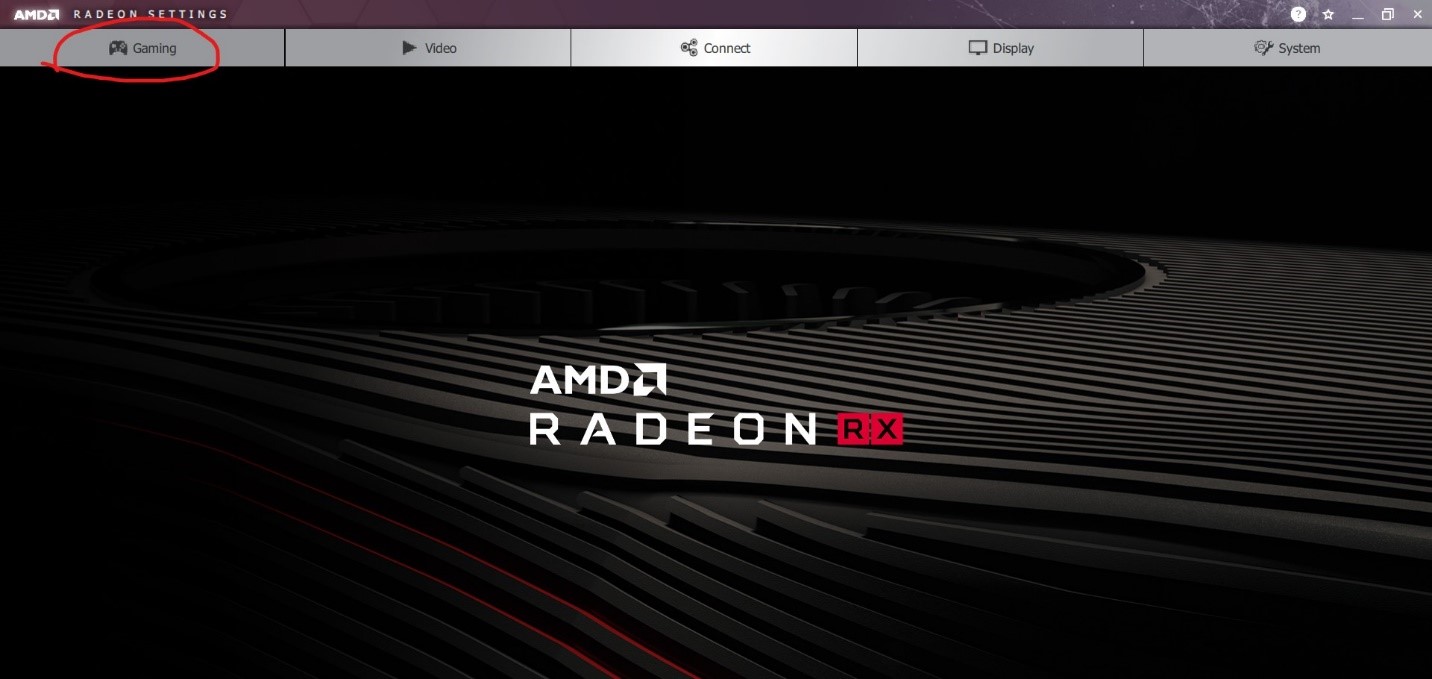
Click on Global Settings

If all went right, the Global Wattman tab should be visible.

If the tab is not visible, go back to Afterburner, disable all the checkboxes, reboot, and repeat Step 1.
Click on the Global Wattman tab.
If any warning about the warranty/risks pops up, click 'Yes' to accept it.
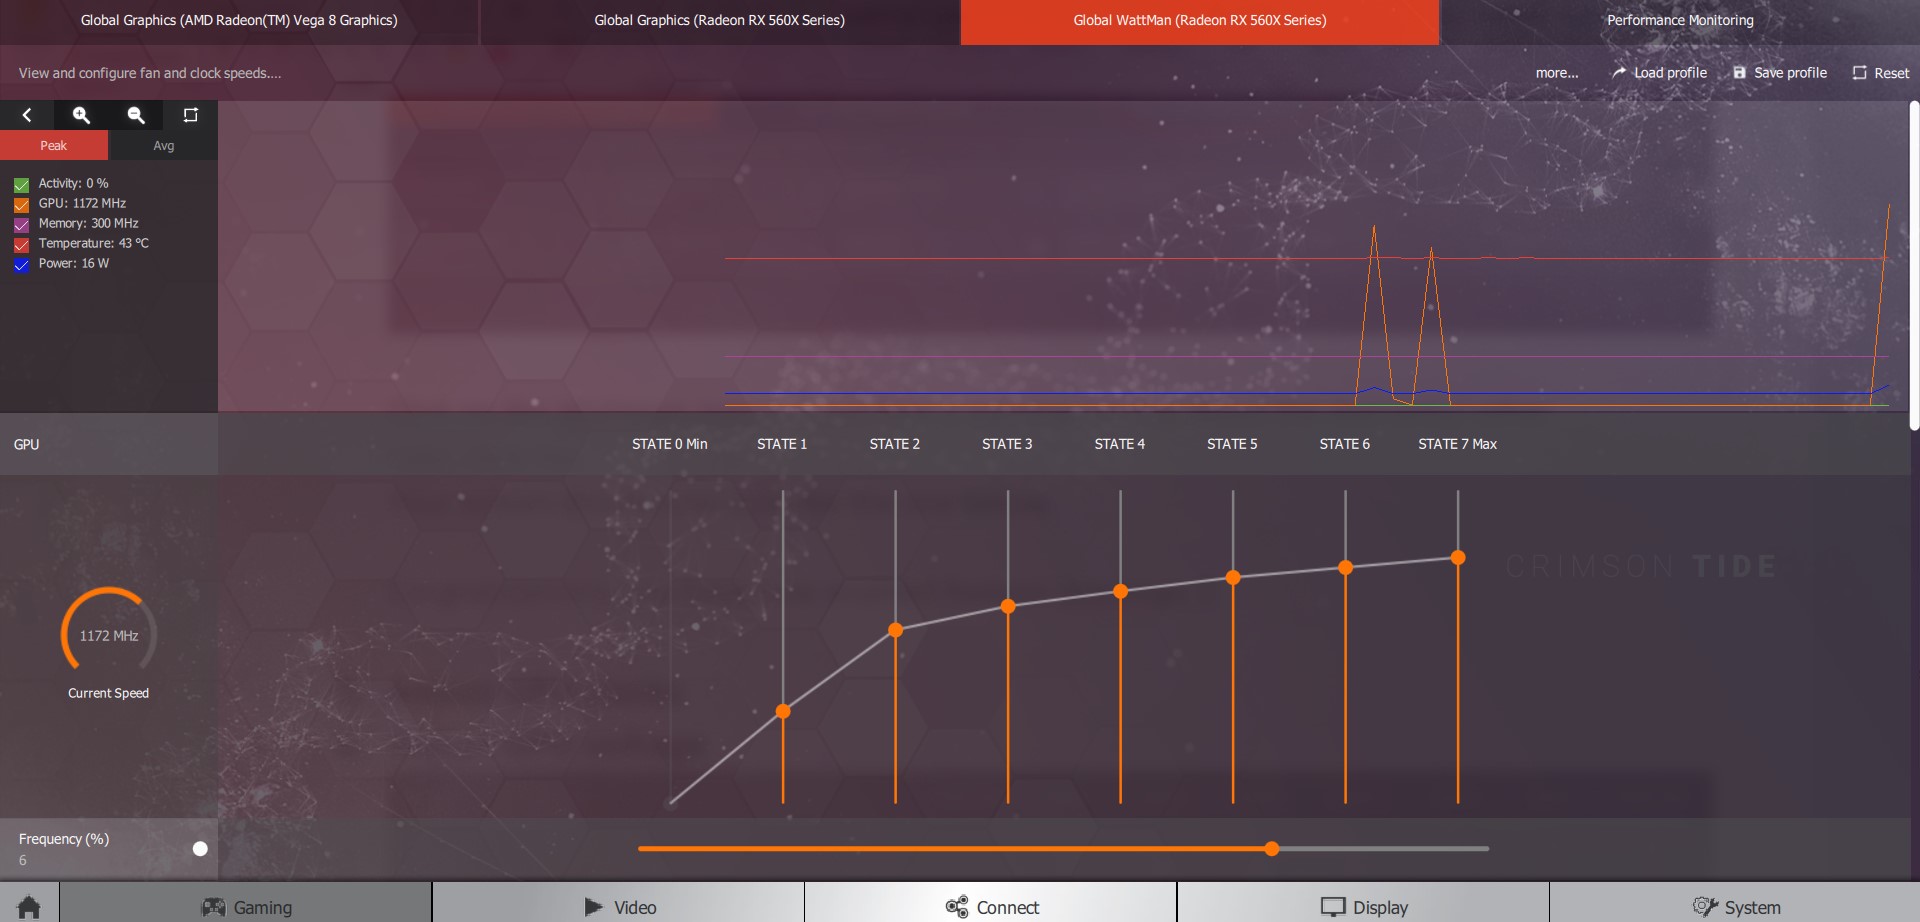
You should now get a screen resembling the one below.
Step 3: Get the baseline score
The baseline score is used to determine the default performance of the GPU. It is
the advertised score of the manufacturer.
To get the baseline, open 3DMark and run the Firestrike benchmark. It is advisable to
close all other GPU-utilizing applications prior to running the benchmark.
After a few minutes of painful waiting, the benchmark result will appear. Note down
the values.
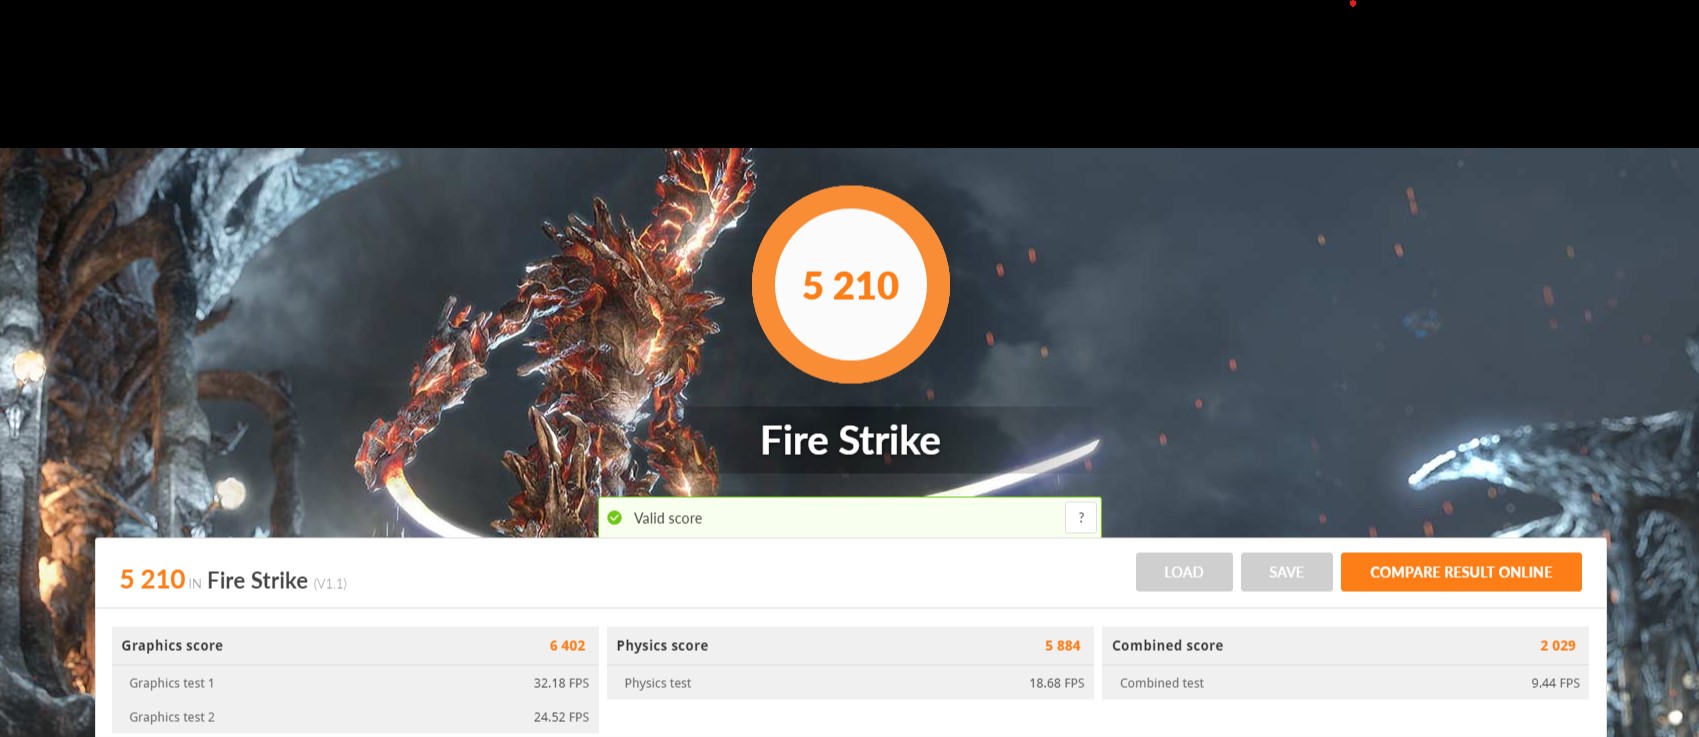
Note that your results may be slightly different from the one above, based on various
factors such as the CPU, RAM, motherboard, and so on.
We are now ready to begin tweaking the card.
Step 4: Basic tweak - Memory Timings
Just like RAM timings
affect the time taken by the CPU to access data in the RAM, GPU vRAM timings affect
the time taken by the GPU to access data in the vRAM. The lower the strobing latency,
the faster is the data access rate.
AMD has included 2 timing levels - level 1 and 2, where level 1 has higher latency
and consumes lesser power, while level 2 has lower latency but consumes higher power.
By default, the timing levels are in level 1 most of the time, to minimize the power draw.
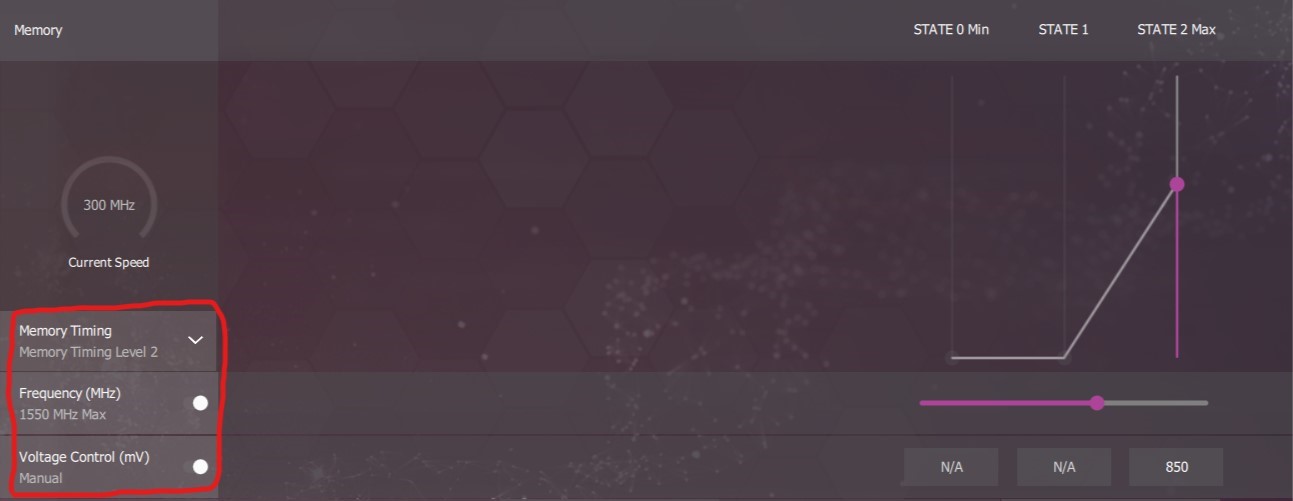
In Wattman, scroll down to the Memory section. Click on Memory Timings and select Memory Timing Level 2
Hit Apply
to apply the changes.
Re-run Firestrike and verify that a small improvemtn in performance has been obtained.
Step 5: Basic tweak - Memory clock speeds and voltages
We'll now fix the clock speed and voltages of the vRAM. While it is possible to play around with these values as well, the performance gain isn't that great. Note that the general tweaking heuristic remains the same, so it is simply a matter of applying them to the vRAM clocks/voltages instead of the GPU clocks/voltages.
Head back to the Memory section in Wattman. Enable the frequency slider and the voltage control.
Slide the frequency slider till 1550Mhz Max.
Set the 3rd value under Voltage Control(mV)
to 850.
Check that it looks like teh above figure.
Again, re-run Firestrike and verify that performance is slightly increased.
While messing around with the clocks and voltages, it is a good idea
to frequently save the current configurations by clicking
Save Profile. This exports
the current settings in an XML file.
After encountering a crash/ degradation in performance, simply click
Load Profile, and select
the saved XML file. This will restore the settings to the saved values, and saves
a lot of time since Wattman gets reset after every crash.
Step 6: Advanced Tweaking - GPU Clocks and Voltages
The idea here is to first increase the clock at a constant voltage, then decrease the
voltage at constant clocks till the system becomes unstables/ crashes.
Unstable state: This occurs when the voltage supplied
is insufficient to drive the clock at the specified rate. As a result we may have a lot
of pixelation and stuttering in the benchmark, or the GPU drivers crash, often causing
the entire system to crash.
Let us now look at the general procedures for overclocking and undervolting.
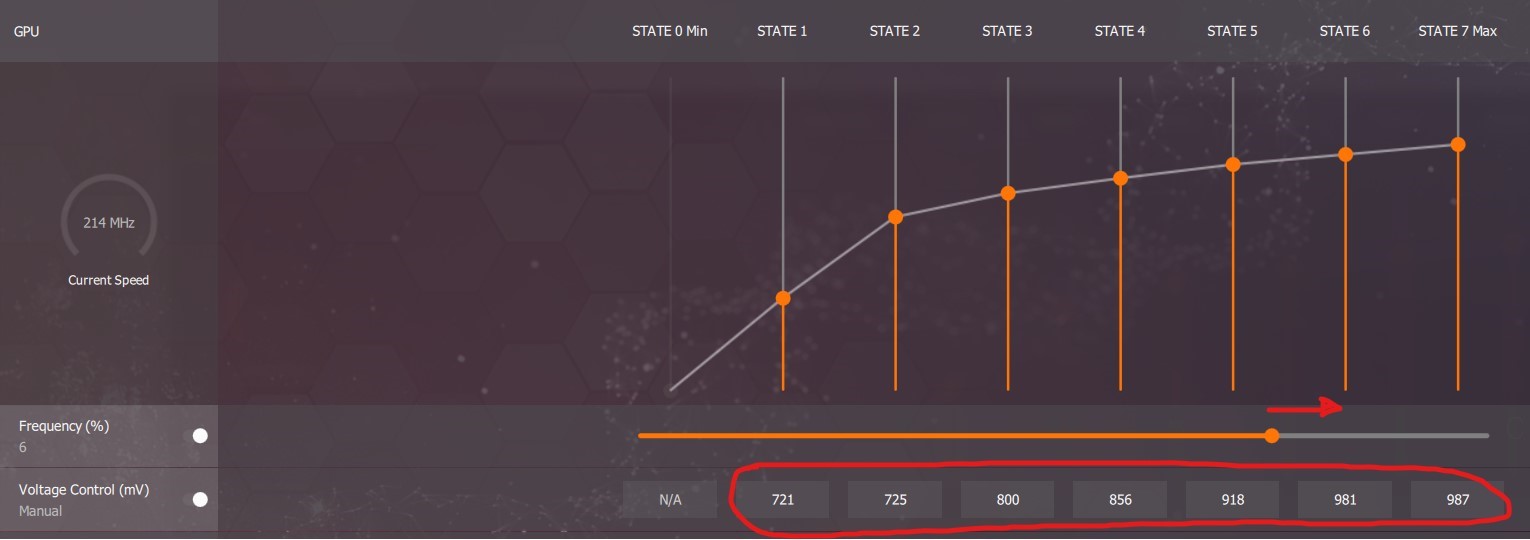
First, scroll up to the GPU section and set
Frequency(%) option.
This allows Wattman to smooth the Frequency-Voltage curve for a given maximum
frequency.
Also set the Voltage Control
mode to manual, to enable changing the voltages.
We are now ready to begin tweaking !
Overclocking
- Drag the orange Frequency slider(Fig. 9) till the Frequency becomes 1%.
- Hit Apply to apply the changes.
- Run FireStrike and record the score.
- If there is an improvement in performance, save the profile and go back to Step 1.
- In case of instability, load the most recent saved XML, and move to the undervolting procedure.
After reaching a maximum clock value, start undervolting to minimize the power consumption and the heat generated. Further, undervolting often reduces the thermal limitation, and higher clocks can be achieved with slightly lower voltages.
Undervolting
-
While the Maximum voltage is above 1000mV:
a. Reduce the maximum voltage by 10mV and Apply
b. Run Firestrike and ensure that it doesn't become unstable. In case of instability go to Step 9. - Save the profile
- Reduce the maximum voltage by 5mV.
- If it becomes less than the second highest voltage, set it equal.
- Run firestrike, and measure the score. In case of instability go to Step 9.
- If Max Voltage > 2nd Highest voltage go to Step 2
- Start reducing the 2nd Highest voltage by 10mV, maintaining atleast 50mV between it and the level below it.
- Again, run Firestrike and record the score. In case of instability go to Step 9.
-
In case of instability, there are 2 options:
a. Reduce the clock-speed in steps of 0.5% till it becomes stable.
b. Load the previous stable configuration, and fix it as the final one
A (quite understandable) question would be
"How to know when to stop?".
The answer for that is two pronged.
First, there is no configuration guaranteed to yield the maximum performance. The above
procedures for overclocking and undervolting are more like
heuristics, i.e., they maximize the chances of getting
a performance improvement. However, it is always advisable to play around a little - using smaller
voltage steps for example. More on this in the Why does it work ? section.
Second, of course, is one's satisfaction with the current performance. The above process
is very time consuming, and once a desirable performance level (improvement in Firestrike score)
has been achieved, it becomes pretty pointless to continue and waste more time.
Results
Great work! The GPU has now been overclocked and undervolted. Play some games to get a first-hand experience of the performance boost.
My final configuration can be seen in Fig. 9.
The Frequency has been increased by 6%.
The maximum voltages are set to 981mV
and 987mV.

From the figure, there is a net increase of 7% in the performance !! The next section deals with the analysis of the results, and is strictly an optional read.
Analysis
The Firestrike benchmark consists of 3 tests - Graphics, Physics, and Combined, each of which test different parts of the GPU. As can be seen in Fig. 10, the change in each is very different from the other. Let us look each one in greater detail.
I. Graphics Test
The graphics test focuses on geometry, illumination, and pixel processing in the GPU. It makes use of both the compute and graphics shaders in order to distribute the work uniformly across the compute units. Here we have almost 5.5% improvement, which is along expected lines, since clock speeds have been increased by 6%.
II. Physics Test
A massive 22% improvement is observed in the Physics scores. The Physics Test mainly loads the CPU with multi-threaded simulation workloads, while keeping the GPU load to a minimum. The sharp increase in performance indicates the presence of a GPU bottleneck. Overclocking the GPU helps relieve this bottleneck, and allows more performance to be extracted from the CPU.
III. Combined Test
The combined test loads both the CPU and the GPU – the CPU for running 32 parallel simulations
and the GPU for various graphics operations present in the Graphics Test.
An improvement of 4.4% is observed, which is slightly less than the 6% clock-speed increase.
Possible reasons for this include:
1. Overheads incurred in transferring the simulation input from the GPU to CPU, and output from
CPU to the GPU.
2. The CPU has not been overclocked. So its contribution remains more or less the same.
But why does this work ?
But if we can increase the performance with such "minimal" effort, then why doesn't the manufacturer keep the cards at these configurations beforehand? Are we just victims of a very poor practical joke?
Fortunately, neither are manufacturers sadistic, nor do they have any sense of humour (so to speak). There is indeed a valid reason for the retail configuration being the way it is. To understand this, we must first look at how GPUs are manufactured.
A GPU is nothing more than a piece of Silicon. And these pieces are manufactured in huge quantities
(100s of thousands at a time). Each batch of GPUs is then rigorously tested for stability. It is
important to note that each GPU is unique, i.e., the Silicon configuration on it is slightly different
from that on other samples. Hence, each GPU potentially gives best performance at a different configuration.
Naturally, the sheer amount of work needed to find the suitable configurations for each and every GPU
makes this highly infeasible.
Further, a very small fraction of samples may fail at clocks higher than a certain
threshold clock, or at voltages lower than a
threshold voltage. Note that this is a "small" fraction,
not a "negligible" fraction. Discarding these samples will lead to huge losses which is unacceptable.
Hence we have all the samples configured with the threshold clock and threshold voltages. Since this configuration is only required for a very samll fraction of GPUs, there are very high chances that a random GPU has headroom for tweaking.
Conclusion
Et voila!! You have successfully tweaked your GPU, and have got an idea of the general procedure to be followed. Note that I have skipped power tweaking completely in order to minimize the risk of damage to the laptop, but this is an important metric to be considered when working in less constrained setups, such as Desktop systems.
Once you get a decent idea of how this works, you can start estimating values in much bigger steps than in the heuristics, and save a lot of time. Also remember that your results may be similar to someone else, but the chances of them being the same are remote (because of reasons discussed in the previous section).
Comments